Tuesday, May 22, 2018

Creating Reusable Groovy Scripts in MuleSoft (3.9)

1.0  Overview
MuleSoft developers around the world would be able to identify with me their challenges and issues when they are infusing Groovy scripts into their Mule applications. The challenge here is not so much about creating snippets of Groovy scripts in the mule application but more about creating reusable groovy scripts in MuleSoft. As of this writing there is no online content that will teach you how to create reusable Groovy scripts, the search results that appears would talk about SOAP UI groovy scripts but you will find nothing that is relevant to what you need.
This article would attempt to teach the reader on how to write reusable groovy scripts and the best practices in infusing groovy scripts into their Mule applications.

2.0 Installing the groovy IDE plug-in

Launch the Anypoint IDE, and at the top menu on the upper left hand conner go to Help > Install New Software, this will launch the “Install” pop up dialog, once there click on the add button on the right hand corner of the first text box (as depicted in Figure 2.0a).
Figure 2.0a
Once the button is clicked you will see another pop up dialog asking for Name and Location (Figure 2.0b).
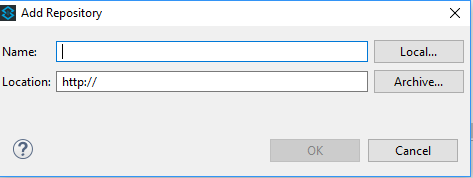
Figure 2.0b
Enter the following name and location into the popup at Figure 2.0b.
  • Name      :groovy plugin
  • Localtion :http://dist.springsource.org/snapshot/GRECLIPSE/e4.5/
Once this is done, you will see that the install dialog would display the following selection for installation, proceed to select all of them (Figure 2.0c), and click next to proceed with installation.
 
Figure 2.0c
Once installation is completed on your Anypoint IDE proceed to the following section (3.0).

3.0 Creating the groovy package

You need to create a new mule project in the Anypoint IDE, once that is done you need to create a subfolder under src/main/resource. The new folder that you are creating would be the package root folder from which your groovy file will reside.
Now Create a new groovy file called “HelloWorld.groovy”. The entire structure of your file would be as the following (Figure 3.0a).
 
Figure 3.0a
Enter the following snippet of code into the file.
package groovystatic String greet(){
        
println "Hello how are you !!!"
        
return "Hello how are you!!!"
}
So what you have essentially done is that by naming the file “HelloWorld.groovy” you are implicitly creating a java class called “HelloWorld” when you create method/functions in the file you are essentially creating function/methods in the “HelloWorld” class. The first statement in the class is the package name which should be the same as your folder name.

4.0 Incorporating the groovy script

Right after creating the groovy script file in section 3.0 we are now ready to incorporate it into our mule application. We will create a simple mule application that looks like the following (Figure 4.0a).
Figure 4.0a
The second message processor is the “groovy scripting message processor”, in the groovy scripting message processor configuration are as displayed below (Figure 4.0b).
Figure 4.0b
And it is that easy to reuse groovy scripts, if you follow my way of creating reusable scripts, you will no longer need to use the “Script File” configuration (displayed in Figure 4.0b).
Full Mule XML code are as listed in the following snipped.
<?xml version="1.0" encoding="UTF-8"?>
<mule xmlns:http="http://www.mulesoft.org/schema/mule/http" xmlns:scripting="http://www.mulesoft.org/schema/mule/scripting" xmlns="http://www.mulesoft.org/schema/mule/core" xmlns:doc="http://www.mulesoft.org/schema/mule/documentation"
        xmlns:spring=
"http://www.springframework.org/schema/beans"
        xmlns:xsi=
"http://www.w3.org/2001/XMLSchema-instance"
        xsi:schemaLocation=
"http://www.springframework.org/schema/beans http://www.springframework.org/schema/beans/spring-beans-current.xsd
http://www.mulesoft.org/schema/mule/core http://www.mulesoft.org/schema/mule/core/current/mule.xsd
http://www.mulesoft.org/schema/mule/http http://www.mulesoft.org/schema/mule/http/current/mule-http.xsd
http://www.mulesoft.org/schema/mule/scripting http://www.mulesoft.org/schema/mule/scripting/current/mule-scripting.xsd"
>
   
<http:listener-config name="HTTP_Listener_Configuration" host="0.0.0.0" port="8081" doc:name="HTTP Listener Configuration"/>
   
<flow name="testgroovyFlow">
       
<http:listener config-ref="HTTP_Listener_Configuration" path="/test" doc:name="HTTP"/>
       
<scripting:component doc:name="Groovy">
           
<scripting:script engine="Groovy"><![CDATA[groovy.HelloWorld.greet()]]></scripting:script>
       
</scripting:component>
   
</flow>
</mule>

5.0 Debugging the Groovy Script

If you follow what I have showed you so far and incorporate the practice in all your mule applications you could even debug the groovy script that you have written (apparently there are people who believe that they can never debug groovy scripts in mule applications, this article will prove them wrong). If you set breakpoints in the following locations (Figure 4.0a and Figure 5.0a), you will able to stop execution at the following points during runtime.
Figure 5.0a shows the blue dots as breakpoints.
Now run the application in debug mode and in your internet browser, browse to the following URL http://localhost:8081/test. You will now see that the runtime execution stops at the first break point (Figure 5.0b).
 
Figure 5.0b
If you move move forward from the first break point, the debugger will move into the groovy script (Figure 5.0c).
Figure 5.0c
This shows that using the following way in creating groovy scripts in your mule application, not only encourages reuse, but also allows for groovy scripts debugging, this will be really helpful when you have complex groovy scripts to debug.
6.0 Conclusion

When you create groovy scripts using the method I have shown you, then you will only need to enter minimal groovy statements at the groovy message processors, and you could leave all the heavy lifting to the scripts declared in the script files, doing it this way would also allow you to build groovy scripts independently from your mule ide and test the groovy script independently to ensure it works before actually using them in the mule application (this will speed up development time tremendously).

Thursday, February 8, 2018

MuleSoft Creating Custom Component/Connector


1.0 Overview


This tutorial will walk a user through on creating a custom mule component where you can use it via the Mule Palette (in Anypoint IDE) during design time. In this article I will show you how to create the connector install it into your Anypoint IDE. I will also demonstrate how you can use it in later mule projects. Besides that I will also go through the necessary maven settings and repository installation that needs to be in place for projects to start using it.

2.0 Creating the Custom Mule Component/Connector


Step 1 is creating an Anypoint Connector Project (as depicted in Figure 2.0a).
Figure 2.0a

Choose SDK Based and click on Next Button (as depicted in Figure 2.0b).

Figure 2.0b

Now key in the desired connector name, here for demonstration sake I will just use my name (depicted in Figure 2.0c) and click Finish.

Figure 2.0c

3.0 Modifying the connector code


Once the connector is created, you will notice that you have two java class being created (depicted in Figure 3.0a).
Figure 3.0a

The first connector class is where you implement your desired functionalities. The second class the connector java class is where you capture all the necessary configurations that you might need for your connector class.
Include the following imports in your Connector java file.

import java.io.IOException;
import org.mule.api.annotations.Config;
import org.mule.api.annotations.Connector;
import org.mule.api.annotations.Processor;
import org.mule.api.MuleEvent;
import org.mule.api.MuleException;
import org.mule.api.MuleMessage;
import org.mule.api.annotations.Config;
import org.mule.api.annotations.Connector;
import org.mule.api.annotations.Processor;
import org.mule.api.annotations.lifecycle.OnException;
import org.mule.api.lifecycle.InitialisationException;
import org.slf4j.Logger;
import org.slf4j.LoggerFactory;
import org.mule.modules.kian.config.ConnectorConfig;

Add the logger so that custom connectors would be able to log its data onto the mule log.

Logger log = LoggerFactory.getLogger(KianConnector.class);

Now modify the java code from left to the one depicted in the below (listing 3.0a) with the loger code listing depicted right after it (listing 3.0b).

@Processor
   public String greet(String friend) {
       /*
        * MESSAGE PROCESSOR CODE GOES HERE
        */
       return config.getGreeting() + " " + friend + ". " + config.getReply();
   }
Listing 3.0A

@Processor
   public MuleEvent doSomething(final MuleEvent event, MuleMessage muleMessage)
    throws InitialisationException, IOException, NullPointerException, MuleException {
    try{
String corelationId =  event.getMessage().getCorrelationId(); //check
log.info(String.format("corelationId: %s", corelationId));

int correlationGroupSize = event.getMessage().getCorrelationGroupSize();
log.info(String.format("correlationGroupSize: %s", correlationGroupSize));

int correlationSequence = event.getMessage().getCorrelationSequence();
log.info(String.format("correlationSequence: %s", correlationSequence));

String encoding = event.getMessage().getEncoding(); // check
log.info(String.format("encoding: %s", encoding));

Object OriginalPayload = event.getMessage().getOriginalPayload();
log.info(String.format("OriginalPayload: %s", OriginalPayload));

String messageRootId = event.getMessage().getMessageRootId(); // check
log.info(String.format("messageRootId: %s", messageRootId));

Object error = event.getMessage().getExceptionPayload(); // check
log.info(String.format("error: %s", error));

    String payload = event.getMessage().getPayloadAsString();// check
    log.info(String.format("Payload: %s", payload));
    }catch(Exception ex){
    log.error("Error Encountered from custom component ",ex);
    }
    return event;
   }
Listing 3.0b

The last return line is important, if you return a string or anything else besides an event it will overwrite any payload that passes through your connectors, if this is not what you want then you should return an event instead.

Now after all these is done, the next thing you need to do is to build/compile the application and install it into your IDE so that you can use it in your mule application.

4.0 Installing into your IDE

After you have done all the steps in section 3.0 now you are ready to install your custom component/connector to be used in a regular mule application.

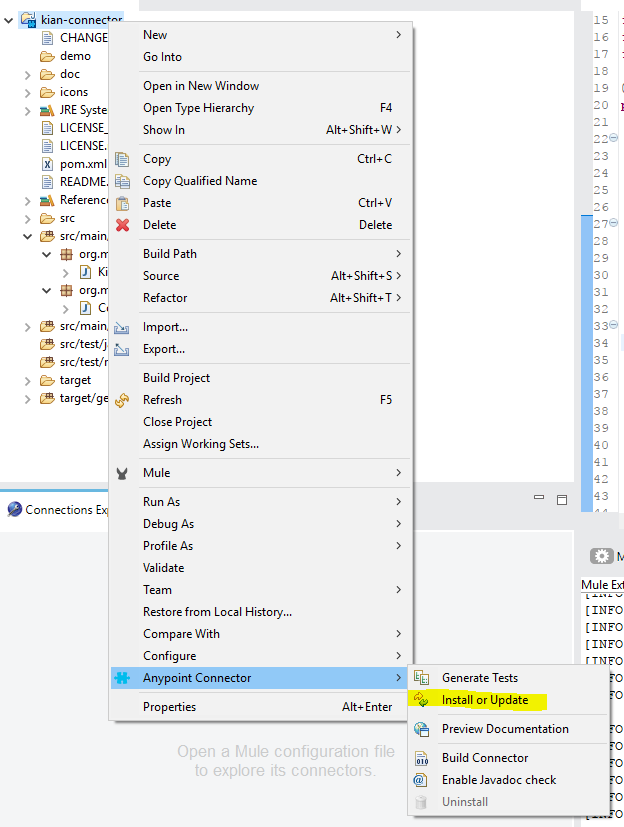
As depicted in Figure 4.0a, you need to right click on the custom connector project, go to Anypoint Connector, expand the sub menu and click on “Install or Update”.
Figure 4.0a

Once it is successfully installed into you IDE you will get the following prompt as depicted in Figure 4.0b.

Figure 4.0b

If you don't get this prompt, then it would mean that you have compilation errors, you need to dig into the compilation errors to check what is wrong it your code.

5.0 Implementing Custom Components into Mule App

This section I will demonstrate on how you could implement the previously built connector into a mule application.

Go to File > New > Mule Project as depicted in Figure 5.0a.
Figure 5.0a

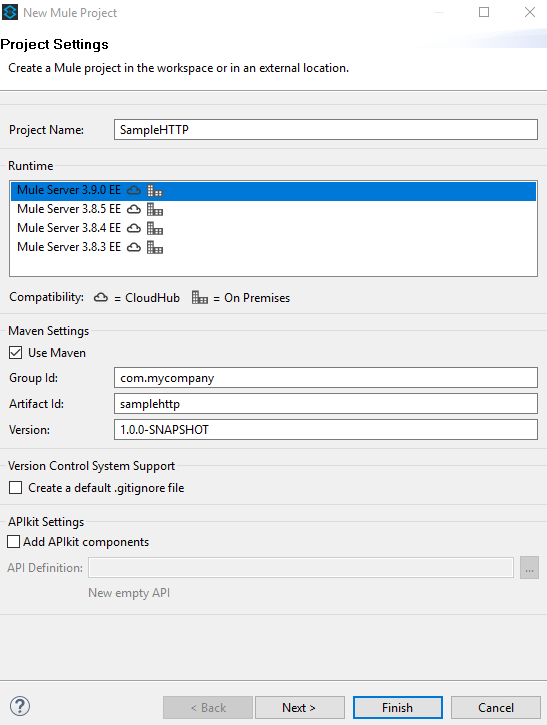
Now create a sample HTTP project with maven enabled (it is important to have it maven enabled because I want to show you how dependencies are created, when you start using the custom component) (as depicted in Figure 5.0b).
Figure 5.0b

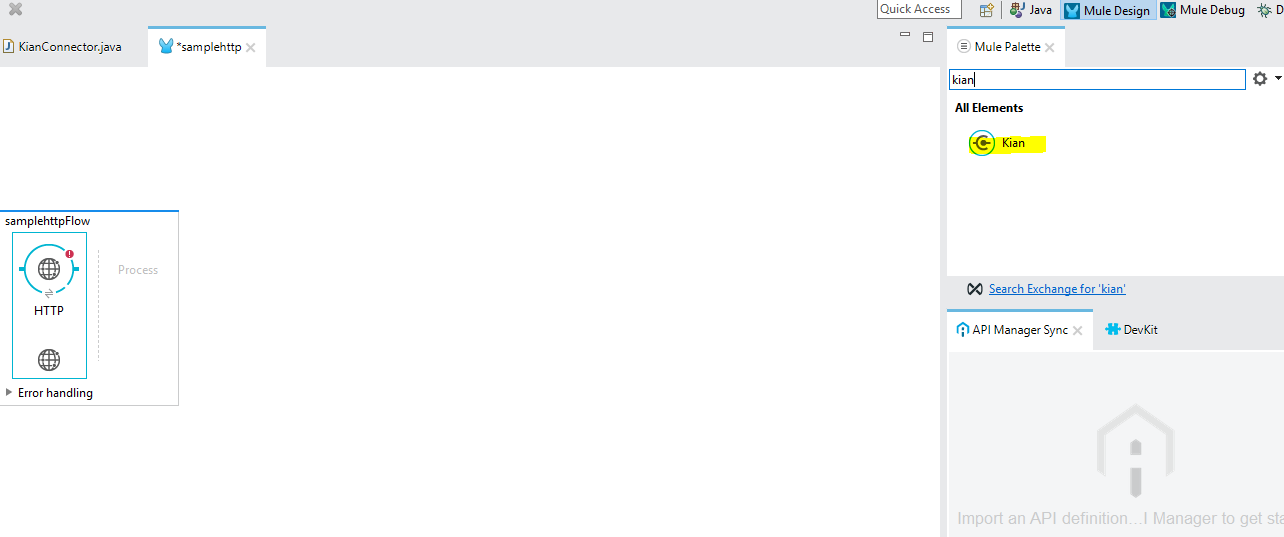
After creating the mule application, we will now drag and drop the custom component from the Mule Palette across to the mule configuration canvas (Figure 5.0c). If you search for “Kian” from the Mule Palette you will find it, now drag it across the canvas and drop it beside the HTTP connector.

Figure 5.0c

If you look at your connector configuration screen you will see 2 basic settings, the first one is the Connector Configuration and the second one is the Operation settings. (as depicted in Figure 5.0d)
Figure 5.0d

Now if you observe close enough under Operations you will see that “Do something” actually coincides with our method name of our previously written connector class (Figure 5.0e).
Figure 5.0e

And if you go into the Connector Configuration of the custom component, you will see 3 text boxes, the first one being the name of the connector, and the two other text box under “General” tabs are Greeting and Reply (depicted in Figure 5.0f).
Figure 5.0f
Now if you contrast the two setting against the ConnectorConfig java class in our custom component you will see that mule actually creates a text box to capture each configurable property that we have coded into this class (Figure 5.0g).
Figure 5.0g

Now let's move on to testing the Mule application with the new connector as part of its implementation, fire up the mule application by starting it in the IDE. Launch postman, and key in the following json as part of the payload to post to the mule app (Figure 5.0h).

{
   "frequencyTimeUnit": "SECONDS",
   "frequency": "120"
}

Figure 5.0h

Now if you move on back to the IDE you will see that the implementation to log something is actually working because your IDE console would print out the following logs (Figure 5.0i).
You will see your payload being printed in the console and together with all it’s related stuff.

6.0 Uninstalling the Custom Component/Connector

In order to modify the custom connector you will need in first uninstall it from ide. There are many ways you can uninstall the custom connector, here I will only show you how to do it via the Custom Connector project.

Right click on the project goto “Anypoint Connector” and then click on Uninstall (as depicted in Figure 6.0a).
Figure 6.0a

Once Un-installation is successful, you will see a pop up dialog box from your IDE as per depicted in Figure 6.0b.
Figure 6.0b

If you click ok your IDE will restart to reflect the changes.

7.0 Noticing the impact of uninstalling the custom component

If you have successfully uninstalled your connector from the IDE, it doesn't mean that it will remove it from the projects that it is dependant upon. If you go back to the Mule App in which you have implemented the custom connector you will notice that the Connector is now greyed out, what this means is that the IDE don't recognize the connector (Figure 7.0a).
Figure 7.0a

The second thing you will notice is that you can no longer find the custom connector from you IDE’s Mule Palette.

The third thing you will notice is that your mule projects maven dependency file (your mule app’s pom.xml file) will still contain entries for the custom connector (ie Figure 7.0b and Figure 7.0c).
Figure 7.0b

Figure 7.0c

If you decide that you no longer want to use the custom component in your mule projects you need to remove them manually.

8.0 Modifying the custom component


After uninstalling the custom component from the previous section now let's make further modification on it to print out the connector settings.

Go back to the Connector class and change the operations method to the following code.

   @Processor
   public MuleEvent doSomething(final MuleEvent event, MuleMessage muleMessage)
    throws InitialisationException, IOException, NullPointerException, MuleException {
    try{
String corelationId =  event.getMessage().getCorrelationId(); //check
log.info(String.format("corelationId: %s", corelationId));

int correlationGroupSize = event.getMessage().getCorrelationGroupSize();
log.info(String.format("correlationGroupSize: %s", correlationGroupSize));

int correlationSequence = event.getMessage().getCorrelationSequence();
log.info(String.format("correlationSequence: %s", correlationSequence));

String encoding = event.getMessage().getEncoding(); // check
log.info(String.format("encoding: %s", encoding));

Object OriginalPayload = event.getMessage().getOriginalPayload();
log.info(String.format("OriginalPayload: %s", OriginalPayload));

String messageRootId = event.getMessage().getMessageRootId(); // check
log.info(String.format("messageRootId: %s", messageRootId));

Object error = event.getMessage().getExceptionPayload(); // check
log.info(String.format("error: %s", error));

    String payload = event.getMessage().getPayloadAsString();// check
    log.info(String.format("Payload: %s", payload));
    
    log.info(String.format("Connector Settings (Greeting): %s", config.getGreeting()));
    log.info(String.format("Connector Settings (Reply): %s", config.getReply()));

    }catch(Exception ex){
    log.error("Error Encountered from custom component ",ex);
    }
    return event;
   }

Now carry out the same action to install the components (refer to the previous sections on how to install the component).

If you face any issue reinstalling the connector, you just need to close the IDE manually remove the target folder and open up the ide to do the installation again.

Now if you run postman again, with the same settings as you have from the previous section, you will see that you have additional two log entries from your connectors (as depicted in Figure 8.0a).

Figure 8.0a

And you will see the following logs in your ide console (as depicted in Figure 8.0b).
Figure 8.0b

9.0 Conclusion

When you build custom components/connectors you need to ensure that it is build to be stable otherwise it would affect the stability of your whole mule application. You will also need to devise sufficient testing strategy on the mule application so that no unstable version of it would be released to production for use. You will also need to decide if you want your custom component to carry out its operation in Asynchronous or Synchronous mode, by default all connectors implementation would be carried out in Synchronous fashion, if you want it to be otherwise you have to programatically code in the async feature.

The source code for this tutorial is avialable at the following link.
https://github.com/kianting/CustomConnectorTutorial