Monday, February 22, 2021

Standing Up Forgerock Stack On Your Local Machine


1.0 Overview


It is quite hard to grok or grasp certain security concepts if you do not have an actual environment to play with, or sometimes you need to raise a Forgerock ticket and you need a vanilla environment to replicate an issue, this article will help you set up the latest version of vanilla Forgerock environment.


The instructions mentioned in this article is about how to stand up the whole Forgerock stack on a Mac machine, if you are using other OSes I would imagine that the . Before continuing you should already have the prerequisite software already set up on your Mac machine. 


2.0 Prerequisite

  • Docker Desktop - Install Docker Desktop for Mac via the download file.

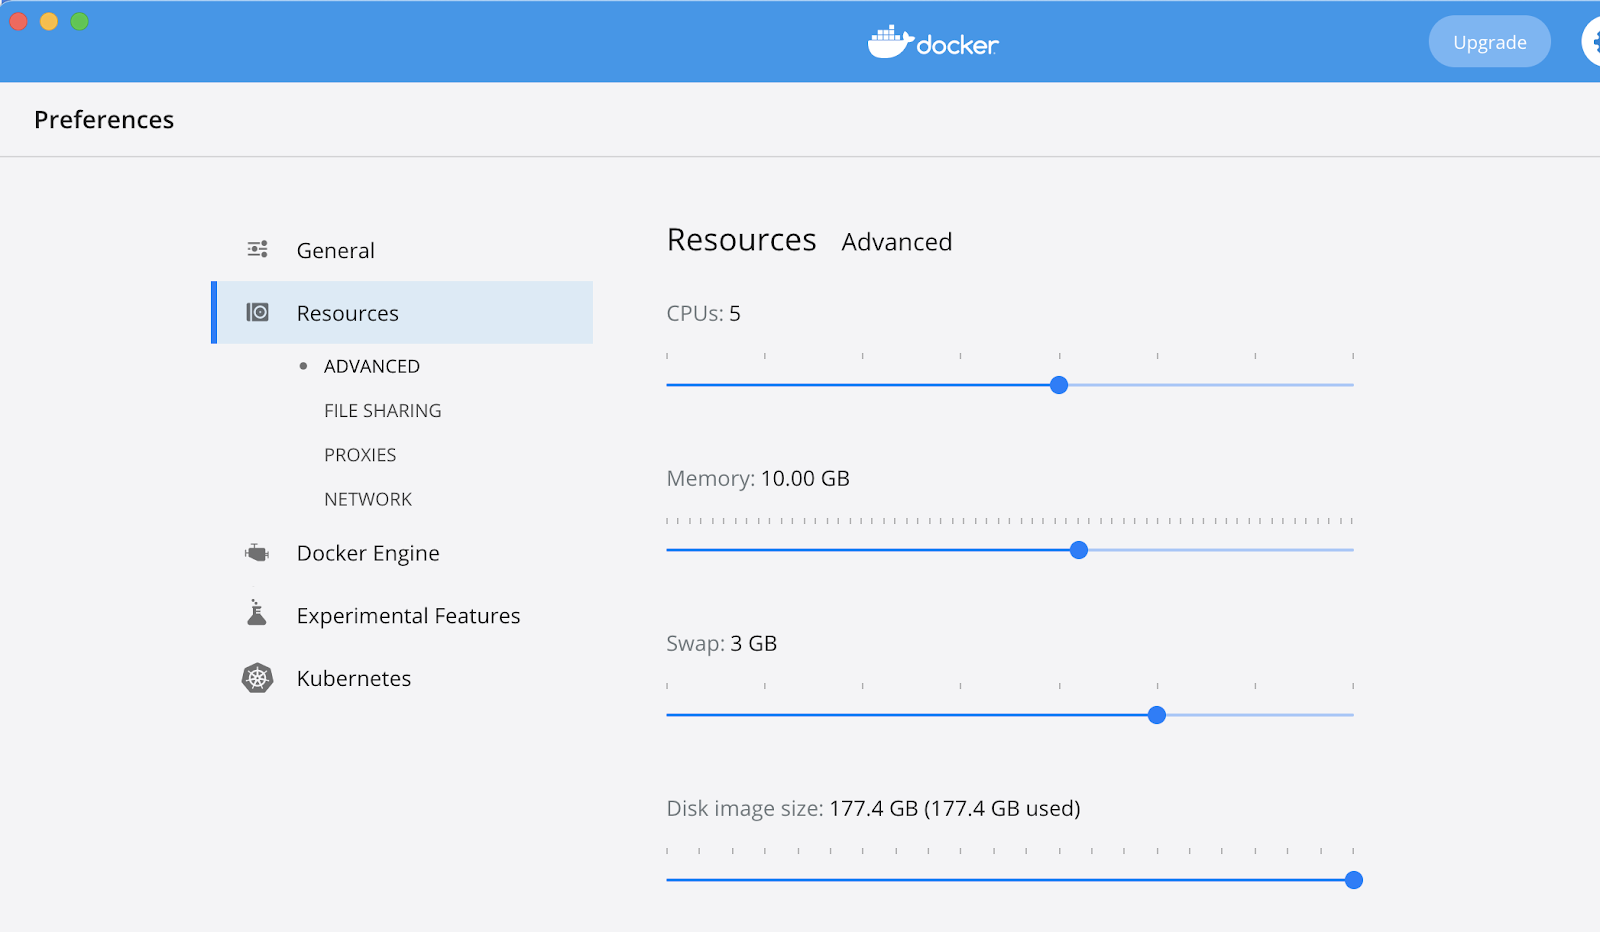
    • Allocating ample resources to your docker 

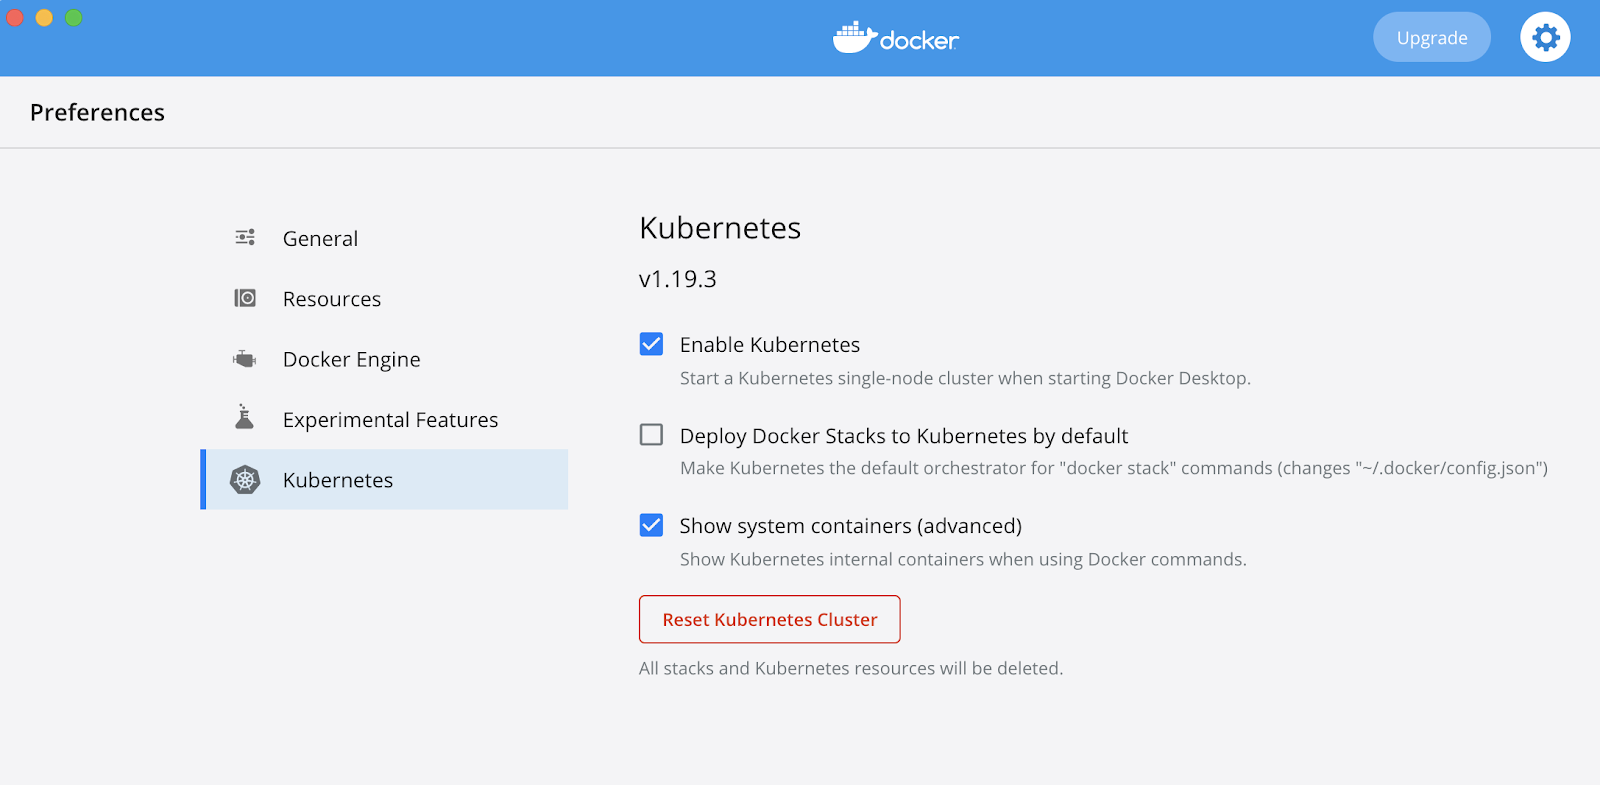
  • Enable Kubernetes Cluster in your docker


  • K9s - K9s is a kubernetes dash board for browsing and managing deployed kubernetes resources/objects

$ brew install derailed/k9s/k9s


  • kubectx - kubectx is to set the context of current shell so that all subsequent kubectl command would be contextualized to a set cluster

$ brew install kubectx


  • Skaffold - skaffold is a CI/CD tool for kubenetes clusters, here it is used to stand up the forgerock cluster.

$ brew install skaffold


  • kubefwd - kubefwd is a tools to mass forward services ports so that you could access the services from outside the kube cluster, this is important for testing purposes

$ brew install txn2/tap/kubefwd


  • kustomize - kustomize is a tool that allows users to create configuration overlays that could be applied to kubernetes configuration files before they are being deployed into the kube environment, in short it allows for users to surfaced out configuration so that it could be injected by ci/cd pipelines.

$ brew install kustomize


$ kubectl apply -f https://raw.githubusercontent.com/kubernetes/ingress-nginx/controller-v0.44.0/deploy/static/provider/cloud/deploy.yaml


  • Forgerock Secret Agent -  You will need the forgerock secret agent to curn out passwords and secrets while it is being installed and stood up

$ kubectl apply -f https://github.com/ForgeRock/secret-agent/releases/latest/download/secret-agent.yaml


3.0 Setting Up the Forgerock Stack

The following instructions would allow you to set up the whole Forgerock stack of components in your local mac machine.


3.1 Cloning the ForgeOps Repository

The first step to set up the whole forgerock stack is to clone the ForgeOps Github code. For more information about deployment of Forgerock components in Kubernetes Clusters and how to automate them via CI/CD pipelines you could head on to the ForgeOps documentation. Run the following command to clone the code.


$ git clone https://github.com/ForgeRock/forgeops.git


Now switch the code into a feature branch that is used for deployments to local Kubenetes cluster.

$ cd forgeops
$ git checkout tags/2020.08.07-ZucchiniRicotta.1 -b my-branch


3.2 Setting Up the Right Execution Context

Before you go further you need to set up the kube context. Inorder to check what kubernetes context you are on right now, you could run kubectx without any arguments. The following print screen shows that my current kube context is set the the docker kubernetes cluster, because it is highlighted in yellow.


If the docker kubernetes cluster is not set as context then run the following command.

$ kubectx docker-desktop


In these instructions we are going to use the default namespace in the kube cluster and the default namespace is also called default.

$ kubens default


Now finally we need to set up the right Skaffold context, runt the following command.

$ skaffold config set --kube-context docker-desktop local-cluster true


3.3 Installing the Forgerock Stack

Before you run Skaffold command to inflate the Forgorck stack onto your local kubernetes cluster you need to modify a line of code in the forgeops repository, go to the following file.


./kustomize/overlay/7.0/all/kustomization.yaml


The path provided above is a relative path from inside the forgeops folder. Modify the FQDN to the following.


After modifying the file, please remember to save it. Then run the following command so that the environment specific files would be generated.

$ cd bin; ./config.sh init --profile cdk --version 7.0


Once the configuration files are churned out, go back to the forgeops root directory and run Skaffold.

$ cd ..; skaffold run


After running Skaffold it will start to deploy all the forerock components into your local kubernetes cluster, you need to wait for the deployment to finish and for all the components to come up. 


Inorder to view the statuses of the components run k9s and you will get the following dashboard, here I have listed all pods from all namespaces.

Depending on the color schemes you have configured, once all of them turned blue it would mean that all the Forgerock components are ready and running.

3.4 Setting Up The Network

The following is the kubeforward command, you need to run this in a separate terminal, as it could be run as a long running process to forward ports from services that resides in the listed namespaces. To stop port forwarding just type CTL+D or CTRL+C. 

$ sudo kubefwd services -n default -n ingress-nginx


Once you run the kubefwd command it would create entries of all the forwarded services in your /etc/hosts file like the following.

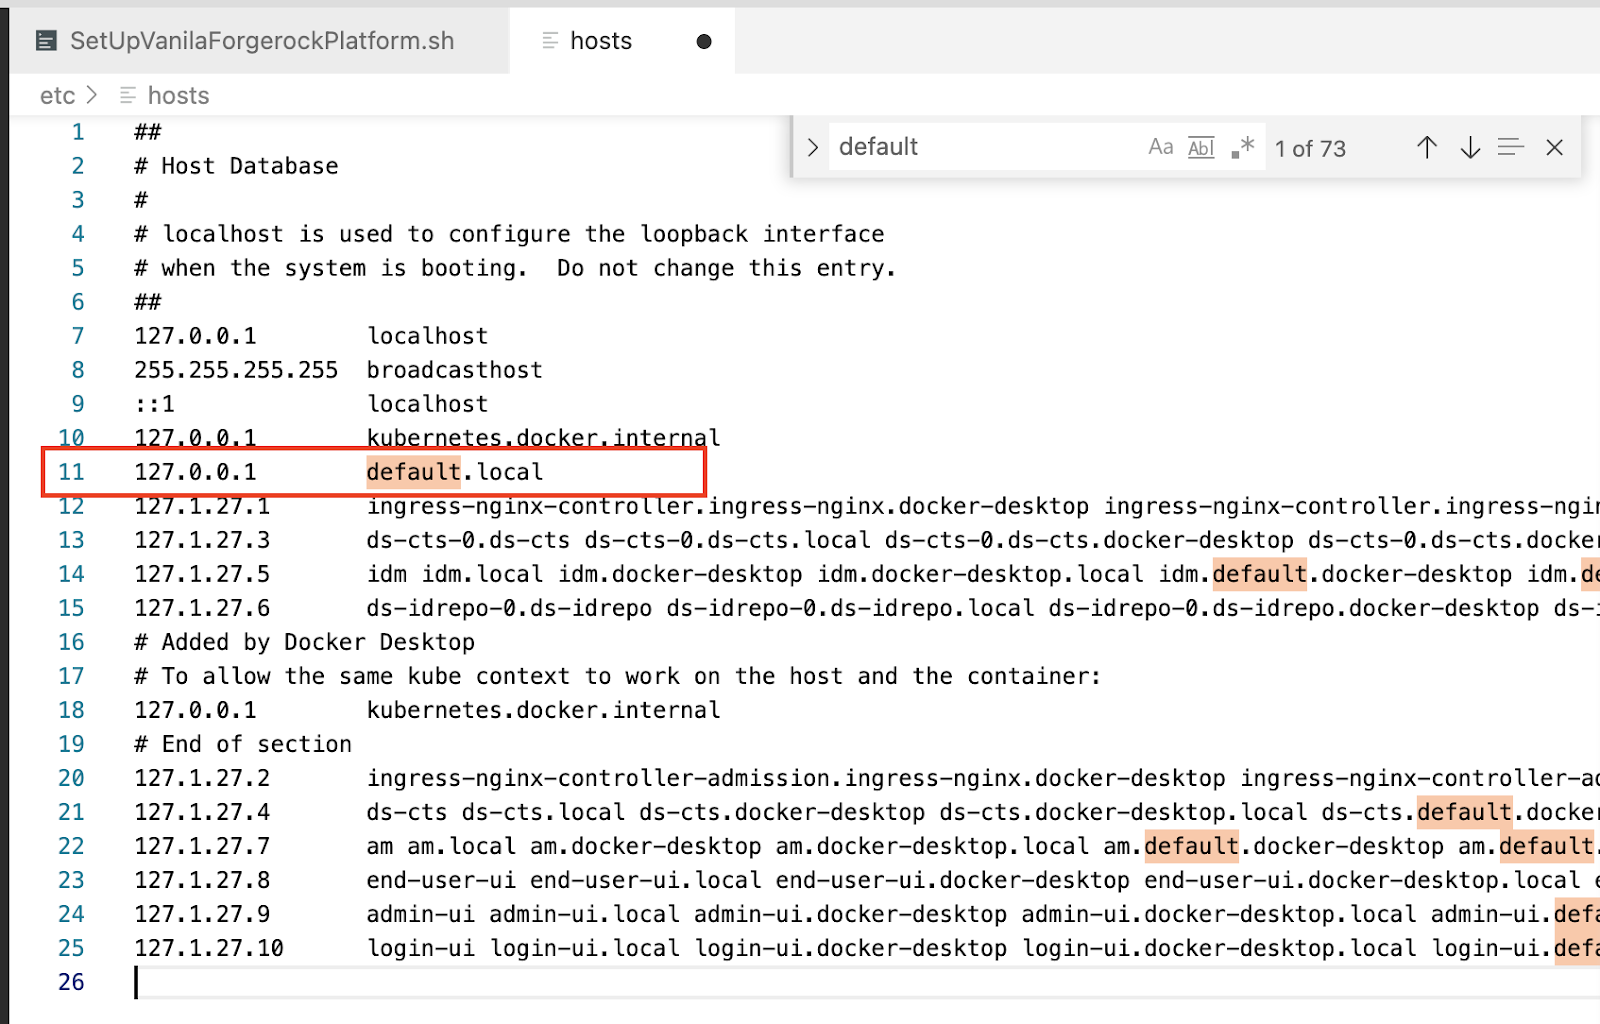
The highlighted box is an entry we have configured as the FQDN in section 3.3, it is important that you configure this to localhost, because all request to this FQDN will be picked up by the kubernetes ingress controller and inturn will be picked up by the Forgerock ingress configurations and eventually be forwarded to it’s respective components.


3.5 Accessing The Forgerock Stack

The following URL will bring you to the installed forerock stack.


The first log in page you will see is the following.

In order to get the password for amadmin user you need to run the following command from the forgeops directory.


./bin/print-secrets.sh amadmin


You will get something like the following output. The output is the password for the amadmin user.


Once you login you will see the following.

4.0 Conclusion

After running all the set up steps mentioned in the preceding sections you have actually successfully installed the following forgerock components.


  • Directory Service

  • Identity Management Service

  • Access Manager Service


For more details about the mentioned components go to the Forgerock documentation. The set up steps will always install the latest available version of forgerock components into your machine because it is using Forgerock’s own Google Container Registry’s docker images. 


The following is a video instruction based on what is written in this article.


Wednesday, June 20, 2018

Applying Custom Policies in On-prem Mule Runtime 3.9.1

1.0 Overview

I have searched high and low for articles that talks about applying api gateway custom policies on the on-prem mule runtimes, but could find none and when there are articles that talks about creating custom policies, it does not demonstrate how it could be applied, and that's really frustrating. I have written this article to help developers learn how they could do this step by step.
I have created two artifact to test the custom policy and they are (source codes to the mentioned artifact are available via the following links).
  • Mule Test API - This is a test api to apply the policy against.
  • Api Policy XML - This is the XML policy that will be used by the built in api gateway (in the mule on-prem runtime) to intercept and filter request/traffic going to the Mule Test API

2.0 Creating the Mule Test API

The Mule Test API is a simple api that accepts get request to  a resource called /test.
It returns the following json payload every time a GET request is being made to the /test resource.
{
   "message": 
"test called"
}
It will always return the same payload unless its traffic is intercepted by the custom policy.

3.0 Creating the Custom Policy

The custom policy is a simple one, it intercepts request going to the “Test API” via the api gateway and decides if it will honor the request and pass it through. Figure 3.0a shows the policy xml that has been created for this demo, there is logically 3 sections in the file, from torp to bottom as depicted by the picture is 1) the processing logic 2) the entry point and 3) the application or resource from which to apply this policy against.
Figure 3.0a
The policy simply interrogates the “kian” http query parameter, if the query parameter contains the value “kian” then the policy will allow the intercepted request to be passed on ward to the “Test Api”, else it will return a message “You shall not pass!” (coming from NZ this is like a common meme we use).

4.0 Deployment and Starting the On-Prem Mule Runtime

As of this writing you would be able to obtain a version of the mule runtime if your organization has a cloudhub account, and you can download a version of the runtime to run on your local machine from the MuleSoft support web site (depicted in Figure 4.0a).
Figure 4.0a
Once you have downloaded it extract the zip file to your local C: drive if you are using windows (I’am using the 3.9.1 version).
You will need to build the test application by executing the mvn clean package command in the “Test Api” project folder, once that is done go to the target folder and copy the zip file over to the apps folder (marked as 2 in Figure 4.0b).
Then place the policy xml file in the policy folder (marked as 3 in Figure 4.0b).
Figure 4.0b
Once all this is done you will need to start up your mule runtime, if you have placed it in the folder structure that is similar to mine you will need to run the following start command form the bin folder in your on-prem mule runtime.
mule -M-Danypoint.platform.gatekeeper=disabled
Once you have executed the command, you will see mule runtime starting up (figure 4.0c).
Figure 4.0c
Once your on prem mule runtime is up and running you will see the following message in your command prompt (Figure 4.0d).
Figure 4.0d

5.0 Testing the policy

Once it your mule runtime is up and running it is now time to test the policy. If you use chrome browser and browse to the following url http://localhost:8081/api/test?kian=kian you will see the following output (Figure 5.0a).
Figure 5.0a
But if you change the value to something other than “kian” as in http://localhost:8081/api/test?kian=gandalf then you will see that the configure policy is being applied (Figure 5.0b).
Figure 5.0b

6.0 Conclusion

From this experiment there are a few things that is being implied when it comes to Mule’s “API gateway”:-

  1. API Gateway is built into the mule runtime, when we start the mule runtime it is also implicitly starting the API Gateway.
  2. All request actually goes through API gateway before it reaches the mule applications that is deployed in the app folder. If you don't put in a policy to intercept request then all request would go through the API gateway and hit it’s predestine endpoints.
  3. Developers could construct complex response mechanism via a mule processor chain in the policy xml file to deal with policy violation.

Tuesday, June 5, 2018

Creating CXF Interceptor in Mule (3.9)

1.0 Overview

When working on creating Mule applications that connects to SOAP web services, developers will often find that they need to have access to the underlying soap fault when a SOAP exception happens. This article will demonstrate how this can be achieved by creating a CXF interceptor.
There is two parts to this article, the first part will talk about how to create the mock soap service, and the second part will talk about creating the Mule app that implements the interceptor. The reason why I have created the Mock SOAP service, is because I want to proof that the recommended steps work, and they are not just merely theoretical suggestions.
I came to know about intercepting Mule Soap calls while working on the following issue:-

2.0 Creating the Mock Soap Service

The source code for the mock soap service is provided in the links at section 1.0, you just need to git clone the code and run the following maven command.


mvn clean package
Once this is done you will now be able to run the SOAP web service, while inside the project folder run the following command.

java -cp .\target\CCCJavaSoapMocker-0.0.1-SNAPSHOT.jar com.kian.mock.soap.service.Main
This command will start up the soap web service, to verify that the soap service is started browse to the following URL in your local machine.

http://localhost:8080/WS/MockService?wsdl
I have used the port 8080 for the mock soap service feel free to change it from the source code, recompile it and run. If the mock soap service is running you will see the following results when you browse to the following wsdl url (Figure 2.0a).
Figure 2.0a

3.0 Creating the custom CXF Interceptor

There is 2 things you need to do to create the custom CXF interceptor. Step 1 is to create the interceptor java class (the implementation) and step to is to create the cxf.xml file that intercepts and divert soap service call to the class.
Then the interceptor is implemented it divers all soap calls in your mule application to the interceptor, if you are only interested to intercept certain soap service call you need to implement that locally, this article will show you how to implement it globally.
The source code for the mule application that has this global CXF Interceptor implementation is provided in the links mentioned in section 1.0.

3.1 Creating the Custom CXF Interceptor Class

The custom interceptor class that is created is located in the following package.

com.kian.cxf.interceptor
Lets zoom in on the following method, because this is the meat of the whole intercepting mechanism, this is the method that will be used to get the SOAP fault.

@Override
        
public void handleMessage(SoapMessage message) throws Fault {
                  InputStream is = (InputStream) message.getContent(InputStream.class);
                  ByteArrayOutputStream os = 
new ByteArrayOutputStream();
                  
try {
                        IOUtils.copy(is, os);
                  } 
catch (IOException e) {
                        log.error(
"SoapFaultInterceptor.handleMessage", e);
                  }
                  InputStream newIs = 
new ByteArrayInputStream(os.toByteArray());
                  message.setContent(InputStream.class, newIs);
                
                  MuleEvent event = (MuleEvent)
                           message.getExchange().get(org.mule.module.cxf.CxfConstants.MULE_EVENT);

                  event.getMessage().setInvocationProperty(
"OriginalPayload",os.toString());
                  log.info(
"Intercepting completed !!!!");
        }
Listing 3.1a
I need you to pay attention to the first line of the code statement in the method, it is getting InputStream from the SoapMessage. This method implementation is specifically for “cxf:inInterceptors” and “cxf:inFaultInterceptors”, (if you use it for “cxf:outInterceptors” or cxf:outFaultInterceptors you will get errors because “message.getContent(InputStream.class)” will return null). This interceptor merely copies the intercepted soap payload into a flow variable called “OriginalPayload”.

3.2 Creating the CXF Interceptor Global Configuration

Now once the java implementation for the CXF interceptor is complete we are ready to configure the global CXF interceptor file. This file will be created in the src/main/resource folder.
The following is a snippet of the contents in the file.

<?xml version="1.0" encoding="UTF-8"?>
<beans xmlns="http://www.springframework.org/schema/beans"
        xmlns:cxf=
"http://cxf.apache.org/core"
        xmlns:xsi=
"http://www.w3.org/2001/XMLSchema-instance"
        xmlns:context=
"http://www.springframework.org/schema/context"
        xsi:schemaLocation=
"http://cxf.apache.org/core http://cxf.apache.org/schemas/core.xsd
                       http://www.springframework.org/schema/beans http://www.springframework.org/schema/beans/spring-beans.xsd
                       http://www.springframework.org/schema/context http://www.springframework.org/schema/context/spring-context.xsd"
>
        
<bean class="com.kian.cxf.interceptor.CustomInterceptor" 
                id="customInterceptor" />
        
<cxf:bus>
                
<cxf:inInterceptors>
                        
<ref bean="customInterceptor" />
                
</cxf:inInterceptors>
        
</cxf:bus>
</beans>
In the configuration file you will need to create a spring bean entry referring to the java class we have previously created in section 3.1 and will later refer to the bean in the “cxf:inInterceptors” configuration (as shown in the snippet).
Your mule project folder should look like the following format (Figure 3.2 a), notice the location of the cxf.xml file.
Figure 3.2a
Your Mule application would look like the following (Figure 3.2b).
The mule app starts to set two numbers a and b, and then assigns these numbers to the soap payload that will be used to invoke the mock soap service, as mentioned earlier the soap service merely conducts a division between “a” and “b”. If you assign “b” with a zero(0), you will get a divide by zero soap fault.
The set payload message processor is used to set the flow variable called “OriginalPayload” as the payload, this is because in the java interceptor code (mentioned in Listing 3.1a), gets the payload that is passing through the interceptor and sets it in a flow variable calle a similar name.

4.0 Conclusion

Now that we have the mule application built it is time to test the interceptor, run the mule application in debug mode. Once the mule app is running in debug mode, use google chrome and browse to the following URL.

http://localhost:8081/test
If you step through the debugger, you will see that the following values for the flow variables that is being passed pas part of the web service payload (Figure 4.0a). This will create a soap fault because we are trying to divide 1 with zero (0).
Figure 4.0a
If you step through the debugger it will also stop at the breakpoints that you have set in the interceptor java code (Figure 4.0b).
Figure 4.0b
The last statement in the interceptor method logs a “Intercepting completed !!!!” complete message. You will see that the interceptor method will only be executed once because in your log you will only see one entry (Figure 4.0c).
Figure 4.0c
SoapFaults will come back to Mule as exception (Figure 4.0d), notice the red dotted square (during debug mode) indicating an exception has been thrown (an error has occurred).
Figure 4.0d
When exception occured during a soap fault, the soap fault payload would be lost when it execution control is passed to “Catch Exception Strategy”, but we have used the intercepting java code to set the intercepted soap fault payload into a flow var, and in the catch exception strategy we have a set payload message processor to set the flow variable named “OriginalPayload” as the payload, this is so that the soap fault would be bubbled up into mule for later manipulation or display.
If the implementation is successful you will see the following response when you do a get on the mule app url (Figure 4.0a).
Figure 4.0a