Wednesday, June 20, 2018

Applying Custom Policies in On-prem Mule Runtime 3.9.1

1.0 Overview

I have searched high and low for articles that talks about applying api gateway custom policies on the on-prem mule runtimes, but could find none and when there are articles that talks about creating custom policies, it does not demonstrate how it could be applied, and that's really frustrating. I have written this article to help developers learn how they could do this step by step.
I have created two artifact to test the custom policy and they are (source codes to the mentioned artifact are available via the following links).
  • Mule Test API - This is a test api to apply the policy against.
  • Api Policy XML - This is the XML policy that will be used by the built in api gateway (in the mule on-prem runtime) to intercept and filter request/traffic going to the Mule Test API

2.0 Creating the Mule Test API

The Mule Test API is a simple api that accepts get request to  a resource called /test.
It returns the following json payload every time a GET request is being made to the /test resource.
{
   "message": 
"test called"
}
It will always return the same payload unless its traffic is intercepted by the custom policy.

3.0 Creating the Custom Policy

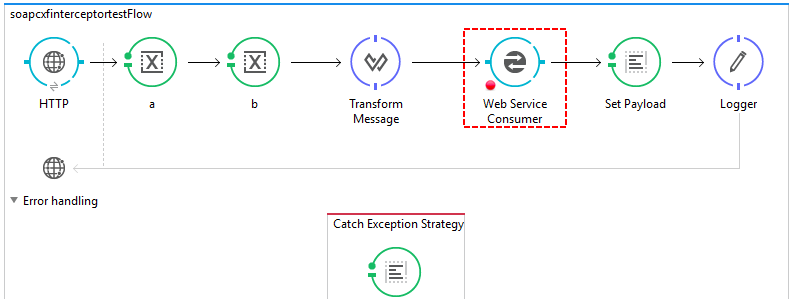
The custom policy is a simple one, it intercepts request going to the “Test API” via the api gateway and decides if it will honor the request and pass it through. Figure 3.0a shows the policy xml that has been created for this demo, there is logically 3 sections in the file, from torp to bottom as depicted by the picture is 1) the processing logic 2) the entry point and 3) the application or resource from which to apply this policy against.
Figure 3.0a
The policy simply interrogates the “kian” http query parameter, if the query parameter contains the value “kian” then the policy will allow the intercepted request to be passed on ward to the “Test Api”, else it will return a message “You shall not pass!” (coming from NZ this is like a common meme we use).

4.0 Deployment and Starting the On-Prem Mule Runtime

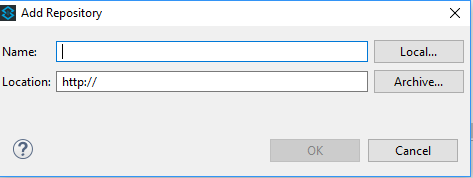
As of this writing you would be able to obtain a version of the mule runtime if your organization has a cloudhub account, and you can download a version of the runtime to run on your local machine from the MuleSoft support web site (depicted in Figure 4.0a).
Figure 4.0a
Once you have downloaded it extract the zip file to your local C: drive if you are using windows (I’am using the 3.9.1 version).
You will need to build the test application by executing the mvn clean package command in the “Test Api” project folder, once that is done go to the target folder and copy the zip file over to the apps folder (marked as 2 in Figure 4.0b).
Then place the policy xml file in the policy folder (marked as 3 in Figure 4.0b).
Figure 4.0b
Once all this is done you will need to start up your mule runtime, if you have placed it in the folder structure that is similar to mine you will need to run the following start command form the bin folder in your on-prem mule runtime.
mule -M-Danypoint.platform.gatekeeper=disabled
Once you have executed the command, you will see mule runtime starting up (figure 4.0c).
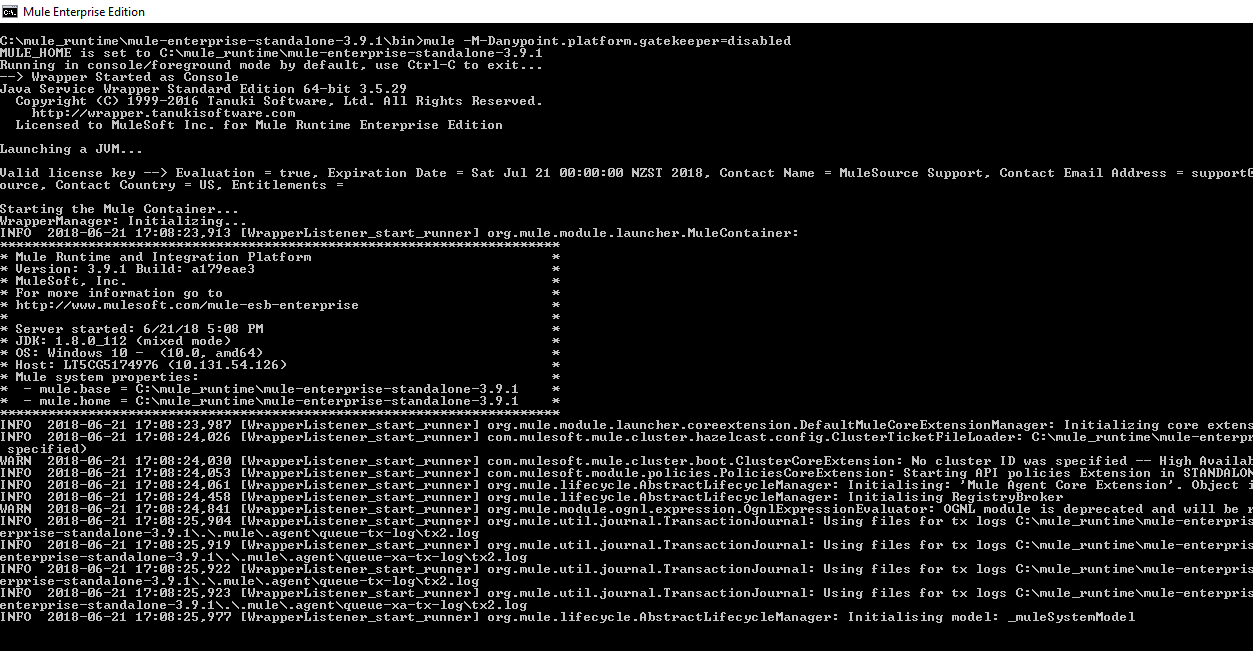
Figure 4.0c
Once your on prem mule runtime is up and running you will see the following message in your command prompt (Figure 4.0d).
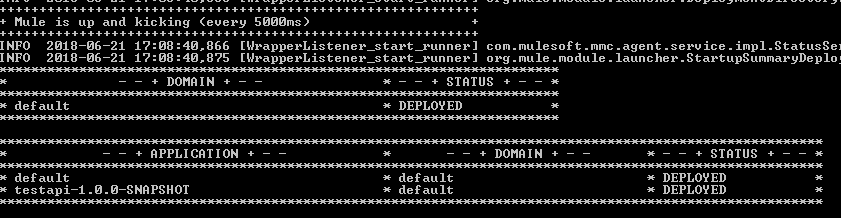
Figure 4.0d

5.0 Testing the policy

Once it your mule runtime is up and running it is now time to test the policy. If you use chrome browser and browse to the following url http://localhost:8081/api/test?kian=kian you will see the following output (Figure 5.0a).
Figure 5.0a
But if you change the value to something other than “kian” as in http://localhost:8081/api/test?kian=gandalf then you will see that the configure policy is being applied (Figure 5.0b).
Figure 5.0b

6.0 Conclusion

From this experiment there are a few things that is being implied when it comes to Mule’s “API gateway”:-

  1. API Gateway is built into the mule runtime, when we start the mule runtime it is also implicitly starting the API Gateway.
  2. All request actually goes through API gateway before it reaches the mule applications that is deployed in the app folder. If you don't put in a policy to intercept request then all request would go through the API gateway and hit it’s predestine endpoints.
  3. Developers could construct complex response mechanism via a mule processor chain in the policy xml file to deal with policy violation.

Tuesday, June 5, 2018

Creating CXF Interceptor in Mule (3.9)

1.0 Overview

When working on creating Mule applications that connects to SOAP web services, developers will often find that they need to have access to the underlying soap fault when a SOAP exception happens. This article will demonstrate how this can be achieved by creating a CXF interceptor.
There is two parts to this article, the first part will talk about how to create the mock soap service, and the second part will talk about creating the Mule app that implements the interceptor. The reason why I have created the Mock SOAP service, is because I want to proof that the recommended steps work, and they are not just merely theoretical suggestions.
I came to know about intercepting Mule Soap calls while working on the following issue:-

2.0 Creating the Mock Soap Service

The source code for the mock soap service is provided in the links at section 1.0, you just need to git clone the code and run the following maven command.


mvn clean package
Once this is done you will now be able to run the SOAP web service, while inside the project folder run the following command.

java -cp .\target\CCCJavaSoapMocker-0.0.1-SNAPSHOT.jar com.kian.mock.soap.service.Main
This command will start up the soap web service, to verify that the soap service is started browse to the following URL in your local machine.

http://localhost:8080/WS/MockService?wsdl
I have used the port 8080 for the mock soap service feel free to change it from the source code, recompile it and run. If the mock soap service is running you will see the following results when you browse to the following wsdl url (Figure 2.0a).
Figure 2.0a

3.0 Creating the custom CXF Interceptor

There is 2 things you need to do to create the custom CXF interceptor. Step 1 is to create the interceptor java class (the implementation) and step to is to create the cxf.xml file that intercepts and divert soap service call to the class.
Then the interceptor is implemented it divers all soap calls in your mule application to the interceptor, if you are only interested to intercept certain soap service call you need to implement that locally, this article will show you how to implement it globally.
The source code for the mule application that has this global CXF Interceptor implementation is provided in the links mentioned in section 1.0.

3.1 Creating the Custom CXF Interceptor Class

The custom interceptor class that is created is located in the following package.

com.kian.cxf.interceptor
Lets zoom in on the following method, because this is the meat of the whole intercepting mechanism, this is the method that will be used to get the SOAP fault.

@Override
        
public void handleMessage(SoapMessage message) throws Fault {
                  InputStream is = (InputStream) message.getContent(InputStream.class);
                  ByteArrayOutputStream os = 
new ByteArrayOutputStream();
                  
try {
                        IOUtils.copy(is, os);
                  } 
catch (IOException e) {
                        log.error(
"SoapFaultInterceptor.handleMessage", e);
                  }
                  InputStream newIs = 
new ByteArrayInputStream(os.toByteArray());
                  message.setContent(InputStream.class, newIs);
                
                  MuleEvent event = (MuleEvent)
                           message.getExchange().get(org.mule.module.cxf.CxfConstants.MULE_EVENT);

                  event.getMessage().setInvocationProperty(
"OriginalPayload",os.toString());
                  log.info(
"Intercepting completed !!!!");
        }
Listing 3.1a
I need you to pay attention to the first line of the code statement in the method, it is getting InputStream from the SoapMessage. This method implementation is specifically for “cxf:inInterceptors” and “cxf:inFaultInterceptors”, (if you use it for “cxf:outInterceptors” or cxf:outFaultInterceptors you will get errors because “message.getContent(InputStream.class)” will return null). This interceptor merely copies the intercepted soap payload into a flow variable called “OriginalPayload”.

3.2 Creating the CXF Interceptor Global Configuration

Now once the java implementation for the CXF interceptor is complete we are ready to configure the global CXF interceptor file. This file will be created in the src/main/resource folder.
The following is a snippet of the contents in the file.

<?xml version="1.0" encoding="UTF-8"?>
<beans xmlns="http://www.springframework.org/schema/beans"
        xmlns:cxf=
"http://cxf.apache.org/core"
        xmlns:xsi=
"http://www.w3.org/2001/XMLSchema-instance"
        xmlns:context=
"http://www.springframework.org/schema/context"
        xsi:schemaLocation=
"http://cxf.apache.org/core http://cxf.apache.org/schemas/core.xsd
                       http://www.springframework.org/schema/beans http://www.springframework.org/schema/beans/spring-beans.xsd
                       http://www.springframework.org/schema/context http://www.springframework.org/schema/context/spring-context.xsd"
>
        
<bean class="com.kian.cxf.interceptor.CustomInterceptor" 
                id="customInterceptor" />
        
<cxf:bus>
                
<cxf:inInterceptors>
                        
<ref bean="customInterceptor" />
                
</cxf:inInterceptors>
        
</cxf:bus>
</beans>
In the configuration file you will need to create a spring bean entry referring to the java class we have previously created in section 3.1 and will later refer to the bean in the “cxf:inInterceptors” configuration (as shown in the snippet).
Your mule project folder should look like the following format (Figure 3.2 a), notice the location of the cxf.xml file.
Figure 3.2a
Your Mule application would look like the following (Figure 3.2b).
The mule app starts to set two numbers a and b, and then assigns these numbers to the soap payload that will be used to invoke the mock soap service, as mentioned earlier the soap service merely conducts a division between “a” and “b”. If you assign “b” with a zero(0), you will get a divide by zero soap fault.
The set payload message processor is used to set the flow variable called “OriginalPayload” as the payload, this is because in the java interceptor code (mentioned in Listing 3.1a), gets the payload that is passing through the interceptor and sets it in a flow variable calle a similar name.

4.0 Conclusion

Now that we have the mule application built it is time to test the interceptor, run the mule application in debug mode. Once the mule app is running in debug mode, use google chrome and browse to the following URL.

http://localhost:8081/test
If you step through the debugger, you will see that the following values for the flow variables that is being passed pas part of the web service payload (Figure 4.0a). This will create a soap fault because we are trying to divide 1 with zero (0).
Figure 4.0a
If you step through the debugger it will also stop at the breakpoints that you have set in the interceptor java code (Figure 4.0b).
Figure 4.0b
The last statement in the interceptor method logs a “Intercepting completed !!!!” complete message. You will see that the interceptor method will only be executed once because in your log you will only see one entry (Figure 4.0c).
Figure 4.0c
SoapFaults will come back to Mule as exception (Figure 4.0d), notice the red dotted square (during debug mode) indicating an exception has been thrown (an error has occurred).
Figure 4.0d
When exception occured during a soap fault, the soap fault payload would be lost when it execution control is passed to “Catch Exception Strategy”, but we have used the intercepting java code to set the intercepted soap fault payload into a flow var, and in the catch exception strategy we have a set payload message processor to set the flow variable named “OriginalPayload” as the payload, this is so that the soap fault would be bubbled up into mule for later manipulation or display.
If the implementation is successful you will see the following response when you do a get on the mule app url (Figure 4.0a).
Figure 4.0a

Tuesday, May 22, 2018

Creating Reusable Groovy Scripts in MuleSoft (3.9)

1.0  Overview
MuleSoft developers around the world would be able to identify with me their challenges and issues when they are infusing Groovy scripts into their Mule applications. The challenge here is not so much about creating snippets of Groovy scripts in the mule application but more about creating reusable groovy scripts in MuleSoft. As of this writing there is no online content that will teach you how to create reusable Groovy scripts, the search results that appears would talk about SOAP UI groovy scripts but you will find nothing that is relevant to what you need.
This article would attempt to teach the reader on how to write reusable groovy scripts and the best practices in infusing groovy scripts into their Mule applications.

2.0 Installing the groovy IDE plug-in

Launch the Anypoint IDE, and at the top menu on the upper left hand conner go to Help > Install New Software, this will launch the “Install” pop up dialog, once there click on the add button on the right hand corner of the first text box (as depicted in Figure 2.0a).
Figure 2.0a
Once the button is clicked you will see another pop up dialog asking for Name and Location (Figure 2.0b).
Figure 2.0b
Enter the following name and location into the popup at Figure 2.0b.
  • Name      :groovy plugin
  • Localtion :http://dist.springsource.org/snapshot/GRECLIPSE/e4.5/
Once this is done, you will see that the install dialog would display the following selection for installation, proceed to select all of them (Figure 2.0c), and click next to proceed with installation.
 
Figure 2.0c
Once installation is completed on your Anypoint IDE proceed to the following section (3.0).

3.0 Creating the groovy package

You need to create a new mule project in the Anypoint IDE, once that is done you need to create a subfolder under src/main/resource. The new folder that you are creating would be the package root folder from which your groovy file will reside.
Now Create a new groovy file called “HelloWorld.groovy”. The entire structure of your file would be as the following (Figure 3.0a).
 
Figure 3.0a
Enter the following snippet of code into the file.
package groovystatic String greet(){
        
println "Hello how are you !!!"
        
return "Hello how are you!!!"
}
So what you have essentially done is that by naming the file “HelloWorld.groovy” you are implicitly creating a java class called “HelloWorld” when you create method/functions in the file you are essentially creating function/methods in the “HelloWorld” class. The first statement in the class is the package name which should be the same as your folder name.

4.0 Incorporating the groovy script

Right after creating the groovy script file in section 3.0 we are now ready to incorporate it into our mule application. We will create a simple mule application that looks like the following (Figure 4.0a).
Figure 4.0a
The second message processor is the “groovy scripting message processor”, in the groovy scripting message processor configuration are as displayed below (Figure 4.0b).
Figure 4.0b
And it is that easy to reuse groovy scripts, if you follow my way of creating reusable scripts, you will no longer need to use the “Script File” configuration (displayed in Figure 4.0b).
Full Mule XML code are as listed in the following snipped.
<?xml version="1.0" encoding="UTF-8"?>
<mule xmlns:http="http://www.mulesoft.org/schema/mule/http" xmlns:scripting="http://www.mulesoft.org/schema/mule/scripting" xmlns="http://www.mulesoft.org/schema/mule/core" xmlns:doc="http://www.mulesoft.org/schema/mule/documentation"
        xmlns:spring=
"http://www.springframework.org/schema/beans"
        xmlns:xsi=
"http://www.w3.org/2001/XMLSchema-instance"
        xsi:schemaLocation=
"http://www.springframework.org/schema/beans http://www.springframework.org/schema/beans/spring-beans-current.xsd
http://www.mulesoft.org/schema/mule/core http://www.mulesoft.org/schema/mule/core/current/mule.xsd
http://www.mulesoft.org/schema/mule/http http://www.mulesoft.org/schema/mule/http/current/mule-http.xsd
http://www.mulesoft.org/schema/mule/scripting http://www.mulesoft.org/schema/mule/scripting/current/mule-scripting.xsd"
>
   
<http:listener-config name="HTTP_Listener_Configuration" host="0.0.0.0" port="8081" doc:name="HTTP Listener Configuration"/>
   
<flow name="testgroovyFlow">
       
<http:listener config-ref="HTTP_Listener_Configuration" path="/test" doc:name="HTTP"/>
       
<scripting:component doc:name="Groovy">
           
<scripting:script engine="Groovy"><![CDATA[groovy.HelloWorld.greet()]]></scripting:script>
       
</scripting:component>
   
</flow>
</mule>

5.0 Debugging the Groovy Script

If you follow what I have showed you so far and incorporate the practice in all your mule applications you could even debug the groovy script that you have written (apparently there are people who believe that they can never debug groovy scripts in mule applications, this article will prove them wrong). If you set breakpoints in the following locations (Figure 4.0a and Figure 5.0a), you will able to stop execution at the following points during runtime.
Figure 5.0a shows the blue dots as breakpoints.
Now run the application in debug mode and in your internet browser, browse to the following URL http://localhost:8081/test. You will now see that the runtime execution stops at the first break point (Figure 5.0b).
 
Figure 5.0b
If you move move forward from the first break point, the debugger will move into the groovy script (Figure 5.0c).
Figure 5.0c
This shows that using the following way in creating groovy scripts in your mule application, not only encourages reuse, but also allows for groovy scripts debugging, this will be really helpful when you have complex groovy scripts to debug.
6.0 Conclusion

When you create groovy scripts using the method I have shown you, then you will only need to enter minimal groovy statements at the groovy message processors, and you could leave all the heavy lifting to the scripts declared in the script files, doing it this way would also allow you to build groovy scripts independently from your mule ide and test the groovy script independently to ensure it works before actually using them in the mule application (this will speed up development time tremendously).