1.0 Overview
Domain projects are for sharing resources, details of it can be acquired from mule documentation. One thing to note is that domain projects only works for on-prem mule runtimes. It will not work for cloudhub. This article will demonstrate how shared connectors work during runtime.
2.0 Creating the Domain Project
First we need to create a Domain Project, to do this (in Anypoint Studio) you need to go to File > Mule Domain Project (as per Figure 2.0a).

Figure 2.0a
Then you would see a pop up dialog, at the pop up dialog key in the following details to create our first domain project (as per Figure 2.0b), click next and click finish.

Figure 2.0b
Once the domain project is created you will see the following (Figure 2.0c).
Figure 2.0c
Notice that at Figure 2.0c there is a commented area, this is where you put all your global connector settings.
3.0 Creating Mule Apps That Uses Domain Project
Next create a normal mule application project by going to File > New > Mule Project (as per Figure 3.0a).

Figure 3.0a
Name it demodomainapp1 as per the following pop-up screen in Figure 3.0b, click next and click finish.

Figure 3.0b
Once demodomainapp1 is created double click on the mule project XML and select the demodomain at the domain list box as per Figure 3.0c.

Figure 3.0c
Once the action on figure 3.0c is done, create the following message processors in demodomainapp1 (Figure 3.0d).

Figure 3.0d
The app in figure 3.0d would have the underlying XML code.
<?xml version="1.0" encoding="UTF-8"?>
<mule xmlns:http="http://www.mulesoft.org/schema/mule/http" xmlns="http://www.mulesoft.org/schema/mule/core" xmlns:doc="http://www.mulesoft.org/schema/mule/documentation" xmlns:spring="http://www.springframework.org/schema/beans" xmlns:xsi="http://www.w3.org/2001/XMLSchema-instance" xsi:schemaLocation="http://www.springframework.org/schema/beans http://www.springframework.org/schema/beans/spring-beans-current.xsd http://www.mulesoft.org/schema/mule/core http://www.mulesoft.org/schema/mule/core/current/mule.xsd http://www.mulesoft.org/schema/mule/http http://www.mulesoft.org/schema/mule/http/current/mule-http.xsd"> <http:listener-config name="HTTP_Listener_Configuration" host="0.0.0.0" port="8081" basePath="/demodomainapp" doc:name="HTTP Listener Configuration"/> <flow name="demodomainapp1Flow"> <http:listener config-ref="HTTP_Listener_Configuration" path="/app1" doc:name="HTTP"/> <logger message="Demo Domain App 1" level="INFO" doc:name="Logger"/> </flow> </mule> |
Now we want to share the http:listener connector for both app 1 and app 2, to do this you need to cut out the listener-config from the app 1 xml and paste it in the domain project. You would also need to replicate the xmlns:http xml namespace import to the domain project.
The mule domain xml file (mule-domain-config.xml) would now have the following code.
<?xml version="1.0" encoding="UTF-8"?>
<domain:mule-domain xmlns="http://www.mulesoft.org/schema/mule/core" xmlns:domain="http://www.mulesoft.org/schema/mule/ee/domain" xmlns:xsi="http://www.w3.org/2001/XMLSchema-instance" xmlns:spring="http://www.springframework.org/schema/beans" xmlns:doc="http://www.mulesoft.org/schema/mule/documentation" xmlns:http="http://www.mulesoft.org/schema/mule/http" xsi:schemaLocation=" http://www.mulesoft.org/schema/mule/core http://www.mulesoft.org/schema/mule/core/current/mule.xsd http://www.springframework.org/schema/beans http://www.springframework.org/schema/beans/spring-beans-current.xsd http://www.mulesoft.org/schema/mule/ee/domain http://www.mulesoft.org/schema/mule/ee/domain/current/mule-domain-ee.xsd http://www.mulesoft.org/schema/mule/http http://www.mulesoft.org/schema/mule/http/current/mule-http.xsd"> <http:listener-config name="HTTP_Listener_Configuration" host="0.0.0.0" port="8081" basePath="/demodomainapp" doc:name="HTTP Listener Configuration"/> </domain:mule-domain> |
Do the same to create demodomainapp2, except here you need to delete the http:listener connector because it is already declared in the domain project.
Upon finishing creating app 2, you will see the following 3 projects in Anypoint Studio (as per depicted in figure 3.0e).

Figure 3.0e
4.0 Debugging The Apps in Runtime
If you want to run app 1 and app 2 in debug mode at the same time then you will need to run debugging at the domain project, to do this you must go to domain project, right click debug as > mule applicaiton with maven as per Figure 4.0a.

Figure 4.0a
When debug mode is successfully running you will see the following (Figure 4.0b) in your console logs.

Figure 4.0b
If you use postman to trigger app 1 as per Figure 4.0c.

Figure 4.0c
You will see that in anypoint studio your debug mode will stop the the breakpoint in app 1 (as per figure 4.0c)

Figure 4.0d
Now if you do the same for app 2, using postman browse to app 2 (Figure 4.0e).

Figure 4.0e
You will now see that anypoint studio has stop execution at app2 break point (as per Figure 4.0f).

Figure 4.0f
Now if you go to the console log in anypoint studio you will see the following log entries from both app 1 and app 2 (Figure 4.0g).

Figure 4.0g
5.0 Deploying them to On-Prem Runtime
The previous section demonstrated how to run applications via domain project in anypoint studio, here I would go through how to deploy the application into an onprem mule runtime (Mule runtime is available from the mule support site).
Figure 5.0a shows all the folders available in on prem runtime. Two folder to note is the app and the domains folder.

Figure 5.0a
You need to go to the target directory in the domain project and copy and paste the zip file across to the mule runtime’s domain folder as depicted in Figure 5.0b from left to right.

Figure 5.0b
Now do the same for app 1 and app 2, both zip files of app 1 and app 2 are available in their respective target directories (as per Figure 5.0c). After copying it to domain folder rename the domain zip file by deleting the “-1.0.0-SNAPSHOT”.

Figure 5.0c
Now when manual deployment is done, proceed to run the mule runtime. Execute the following command in windows command prompt (figure 5.0d).
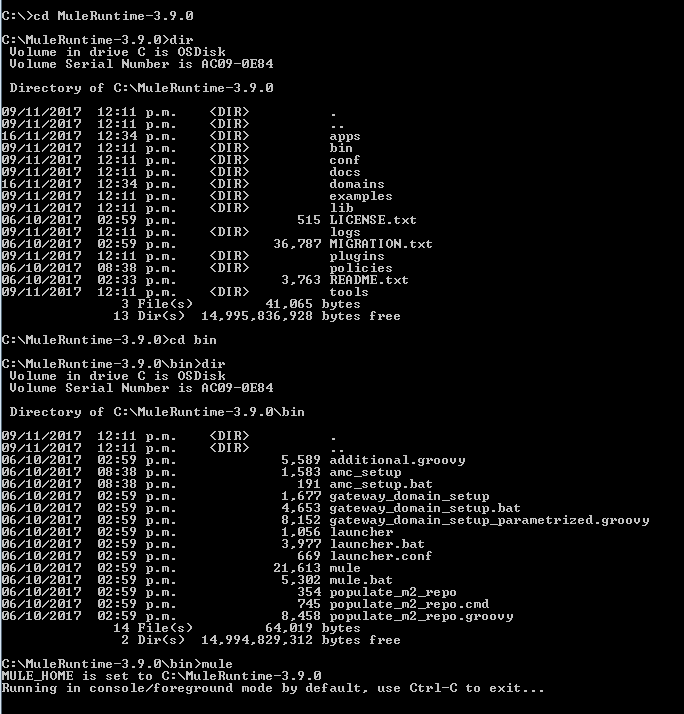
Figure 5.0d
Once the on-prem mule runtime is started successfully you will see the following in the same command prompt window.
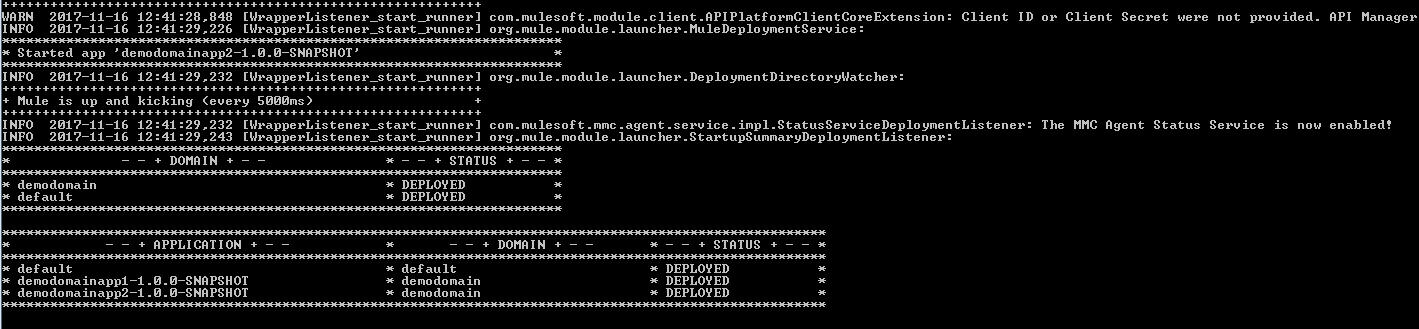
Figure 5.0e
If you test the app 1 and app 2 using the same postman commands, you will see the necessary log entries in their respective log files (figure 5.0f).

Figure 5.0f
6.0 Conclusion
I have demonstrated how to share the same http connector using domain projects, this is handy if you only want a single port opened for your on prem mule apis that is running on the same mule runtime. You could also share JMS or database connectors using domain projects.